Dried herbs are generally three to four times stronger than fresh ones, and basil is one of the most versatile herbs to have in your kitchen. The plant’s leaves are the main component in pesto sauce, while fresh ones are used in sandwiches, salads, omelets, roast meat, and many other recipes.
Air-drying basil is quite simple and a pretty straightforward way to preserve the freshly lemony to peppery flavor of the herb. However, the time plays a crucial role, and it takes about two weeks to dry basil thoroughly. If you are looking for a good way to preserve this herb, check out our How to Dry Basil instructions.
Materials and tools:
- Fresh basil from your garden or store
- Sting, cotton threat, or wool
- Ziplock bag or a plastic container
- Two eye hooks
Recommended reading: How to make dried herbs
Before you begin
If you want to get the best flavor, make sure to pick leaves that are just about to be ready for harvesting. Don’t wait for your basil to ripen thoroughly.
STEP 1: Harvest your basil just before it starts flowering
First thing first, you must be wondering how to harvest basil? Before you even begin the drying process, you should go into your garden and pick some leaves. Apparently, the best time to cut basil is 10 am in the morning when leaves contain the highest amount of oil, giving basil its delicious smell and flavor. Also, many experts suggest that leaves are at their juiciest right before flowering.

Start picking leaves as soon as the plant is up to eight inches tall. Make sure to pick basil leaves regularly to keep the plant going. Basically, the basil plant can produce up to six cups of leaves per week. Depending on how much basil you have, you can harvest as much or as little you want.
STEP 2: Separate basil leaves from the stems
The next step would be to separate leaves from the stems. However, make sure to leave one inch of stem on every leaf, so you can bundle them together later on.
Also, you can start cutting leaves from the top and work your way down until you find a spot where two sets of new leaves are growing.
STEP 3: Rinse the leaves using cold water to remove chemicals and dirt
Rinse one stalk at a time under a light stream of running water. You can gently run your fingers across each leaf if there is a lot of soil.
Alternatively, you can put leaves into clean skin and let them soak for a few minutes. Usually, people don’t use pesticides on herbs, so you may find little bugs on leaves or an occasional spider web.
Once you clean them thoroughly, shake the water off, and then lay the leaves out on a kitchen towel. Roll up the towel very loosely and press gently to remove the water. Leave them this way for a couple of minutes to allow the towel to absorb the water.

STEP 4: Hang the basil leaves to dry on a hook
Next would be to arrange basil leaves into bunches with the cut part of the stems at the top of the bunch. Use some string, wool, or plant twine to tie the stemmy part of the plant.
Don’t hesitate to make this knot tight and secure, as when the basil dries; it will shrink, so you don’t want your bunches to fall apart. Hang the bunches of basil up for drying by screwing two eye hooks into opposite beams while tying the string between them. However, make sure to choose a sunny and well-aired spot.
STEP 5: Let the basil dry for two weeks
Now comes the part where you need to be very patient. It takes approximately two weeks for basil leaves to dry, sometimes even longer. To determine whether basil is ready for storage, try to break one leaf between your fingers. If it’s nice and crunchy and breaks easily, then it’s done.
However, if leaves and stems are flexible and not fragile to touch, give it another week and try again.
Recommended reading: Dehydrator recipes for vegetarians and vegans
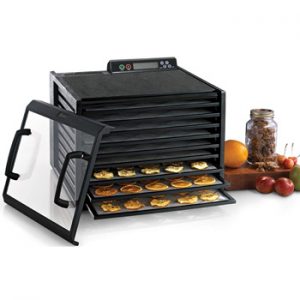
Bonus: How to Dry Basil Using Your Dehydrator?
When we dry basil or other fresh herbs, we should do it as low and slow as possible. It is a proven fact that when food is exposed to heat over 115F, it could lose essential oils, nutrients, and enzymes. So, that’s an important consideration when drying flowers and medical herbs.
However, the dehydrator method is much faster than air drying and can save you a lot of time. On top of that, a dehydrator takes up a lot less space than spreading herbs all over screens or stringing them on a thread and hanging them all over your home.
Now, let’s see how to dry out basil in a dehydrator!
BEFORE YOU BEGIN: compared to the previous method, drying basil in a dehydrator requires removing all stems and drying only leaves. Make sure to harvest this herb just before flowering.
STEP 1: Rinse the basil leaves well to remove dirt and chemicals
As we mentioned before, it’s important to separate the basil leaves from stems while keeping only the tender leafy part. The easiest way is just to pluck or pinch the leaves off. You can toss flowers and stems in your compost.
Rinse the leaves with cold water to remove any insects or dirt, or you can soak them in water for a couple of minutes.
STEP 2: Use paper towels to remove excess moisture and water from the leaves
It’s crucial to get rid of as much water as you can before putting leaves into a dehydrator. However, a bit of moisture won’t hurt. You can either shake out the washed basil leaves or put them on a paper towel to remove the excess water.
Alternatively, you could use a salad spinner if you have one.
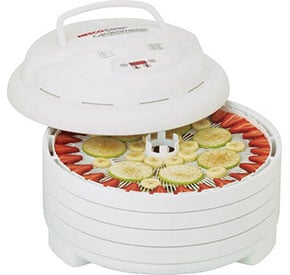
STEP 3: Preheat your dehydrator
The next step would be to preheat your dehydrator. Be aware that basil leaves can easily burn or lose essential oils if the temperature isn’t right. Therefore, start with the lowest temperature setting, which is between 175 and 200 F.
STEP 4: Spread the leaves on the tray
When spreading leaves on a try, make sure they don’t overlap. You want to place them in a nice single layer to ensure excellent airflow and drying.
If leaves aren’t spread properly, they will dry longer than necessary.
STEP 5: Dry the leaves for 24-48h at most
Last but not least is the dehydration process. Tuck the trays of basil into the dehydrator and set the temperature around 100 to 105F. The time to dry leaves depends on your machines, but we recommend drying it anywhere between 24 and 48 hours.
The basil is ready when it’s crispy and crumbles to the touch. Keep in mind that this is crucial for long-term storage. It shouldn’t have any obvious moisture left or be flexible. Fully dried leaves should have light olive-green color and shrink slightly in size.
On the other hand, if you are wondering how to store fresh basil, you can either trim the ends and place it in a water-filled jar or roll it in a single layer of paper towel and place it in a plastic bag.
Conclusion
The foolproof methods you’ve just read will ensure you have the best dry basil leaves. In-depth instructions are easy to follow, don’t require much time, and will make your herbs delicious.
Go through all the steps and select the method that works best for you. Considering basil is a delicate and tender plant, it requires special care. Hopefully, with our how to dry basil leaves guide, you will have the most delicious dry basil in no time, ready to spice any lunch or dinner.